Menu

Showing posts with label MVC. Show all posts

Sunday, 30 November 2014

Skype Status Display For a User in MVC

Scenario
This article explains how to display the user Skype status in the user profile in a MVC application. The administrator in a site wants to view the list of users with his/her Skype status and also wants to chat/call by clicking on the Skype status in the user profile.

Prerequisites


To display the Skype status in a public site, the Skype user must check (select) the privacy setting "Allow my online status to be shown on the Web". You can go to the settings by navigating from the Skype menu Privacy settings and check the "Allow my online status to be shown on the Web" as shown in the following screenshot.


Implementation


Step 1

Create a new project named UsersSkypeStatusInMVC and choose the template MVC. It then creates an MVC template project.

Step 2

Add a Controller named AdminController with the following procedure.
  1. Right-click on the "Controllers" folder and select the Add option and click on the "Controller" link.

  2. It opens a pop-up and then select the option MVC 5 Controller – Empty and then click on the "Add" button.

  3. Again, it opens a popup and then provide the name as AdminController and click on the "Add" button.
Now, the controller is created with a default code.

Step 3

In this step, Add a Model named "UserModel" using the following procedure.
  1. Right-click on the "Models" folder and select the "Add" option and click on the "Class...".

  2. It opens a pop-up and then enter the name as "UserModel.cs" and click on the Add button.
After adding the model, replace the existing code in the file "UserModel.cs" with the following code.

namespace UsersSkypeStatusInMVC.Models    
{    
    ///     
    /// User Model    
    ///     
    public class UserModel    
    {    
        public int UserId { get; set; }    
        public string Name { get; set; }    
        public string Email { get; set; }    
        public string SkypeId { get; set; }    
        public string ProfileImagePath { get; set; }    
    
    }    
}  


Step 4

This step, replace the existing code in the "AdminController.cs" file with the following code.

using System.Collections.Generic;    
using System.Web.Mvc;    
using UsersSkypeStatusInMVC.Models;    
    
namespace UsersSkypeStatusInMVC.Controllers    
{    
    public class AdminController : Controller    
    {    
        // GET: UsersProfile    
        public ActionResult UserProfiles()    
        {    
            List usersList = GetUsers();    
            return View(usersList);    
        }    
    
        ///     
        /// Get the list of sample users    
        ///     
        /// User List    
        private List GetUsers()    
        {    
            var usersList = new List    
            {    
                new UserModel    
                {    
                    UserId = 1,    
                    Name="Ramchand",    
                    Email = "ram@abc.com",    
                    SkypeId = "ramchand.repalle", // Skype Id    
                    ProfileImagePath = "Ramchand.jpg"    
                },    
                new UserModel    
                {    
                    UserId = 2,    
                    Name="Abc",    
                    Email = "chand@abc.com",    
                    SkypeId = "abctest",// Skype Id    
                    ProfileImagePath = "abc.jpg"    
                },    
                new UserModel    
                {    
                    UserId = 3,    
                    Name="def",    
                    Email = "def@abc.com",    
                    SkypeId = "ram",// Skype Id    
                    ProfileImagePath = "def.jpg"    
                }    
            };    
    
            return usersList;    
        }    
    }    
}  

About Code
  1. The GetUsers() method will provide a sample list of users.

  2. You will call that method in the UserProfiles Action Result method and then send that list of users to the view.
Step 5

This step, add a view for the UserProfiles Action controller method by the following procedure:
  1. Right-click on the View() method in the UsersProfile Action method and click on "Add View".

  2. Enter the view name as "UserProfiles" and then click on the "Add" button.
Step 6

This step replaces the existing code in the "UserProfiles.csthtml" file design with the following code.

@model IEnumerable     
    
@{    
    ViewBag.Title = "User Profiles";    
}    

User Profiles

@foreach (var item in Model) { var skypeId = @Html.DisplayFor(modelItem => item.SkypeId); var profileImg = "../../Images/" + @Html.DisplayFor(modelItem => item.ProfileImagePath);
@Html.DisplayFor(modelItem => item.UserId)
@Html.DisplayFor(modelItem => item.Name)
@Html.DisplayFor(modelItem => item.Email)
ProfilePic
}

About the Design 
  1. Added a namespace to get the list of users.

  2. CSS styles are defined.

  3. A foreach loop helps to display the list of users with respective details.

  4. Skype: {SKYPE ID}?chat: This is the href tag, you can use to chat the Skype by clicking on that. For example: skype:ramchand.repalle?chat

  5. Skype: {SKYPE ID}?call: This is the href tag, you can use to call the Skype by clicking on that. For example: skype:ramchand.repalle?call

  6. JavaScript function SkypeUserStatus helps to assign the Skype status image.

  7. SetInterVal has been used to call the SkypeUserStatus function periodically to get the current Skype status of a user.
Step 7

This step helps you about Skype Status URL information and other details. To display the Skype status of any user, you have to request the URL format as follows.

The format of the URL is: http://mystatus.skype.com/{SIZE OF ICON}/{SKYPE ID}

{SIZE OF ICON}: It indicates to display the size of the icon based on user Skype status.

For example: smallicon, mediumicon

{SKYPE ID}: It indicates the Skype Id of the user.

For example: ramchand.repalle

So, the example of the Skype status URL is http://mystatus.skype.com/mediumicon/ramchand.repalle.

You can get the status of the user by just clicking on the previously shown URL.

Step 8

Add a new folder named “Images” with sample images to the “UsersSkypeStatusInMVC” project. It helps display the sample image for the profile picture as mentioned in the "GetUsers()" method in AdminController.


Step 9

Now, build the application (F6), then run (hit F5) an application and navigate to the following URL: (http://localhost:57882/Admin/UserProfiles).


As in the preceding screenshots by clicking on the (Skype) icon it displays a popup to launch the application in Skype. You just click on that then it would open a Skype user window.

The Skype status images are displayed as described below.


The discussed project source code can be downloaded from the link Source Code.

Conclusion


I hope this article helps you to display the Skype user status with the user profile details in a MVC application.


Saturday, 20 September 2014

Prevent Partial view to access directly in MVC


About:


As I discussed in earlier blog post, PartialView is mostly used as a type of user control. So, The partial view result should be used in other pages like a child Request and it should not be accessible by direct Route Url.

By Default, PartialViewResult controller will be accessible through Route Url. But, you can restrict or prvent access by just adding a one attribute above to that controller action method named as “[ChildActionOnly]”.

Example:


Now, you can check it out by the example, Just add the below lines of code in the controller action method in sample MVC application.

    public class DemoController : Controller
    {
        /// 
        /// Demo Partial Result
        /// 
        /// 
        public ActionResult DemoPartialResult()
        {
            return PartialView("_Demo");
        }
    }


Now, you create a partial view named as "_Demo.cshtml" with the template as "Empty (without model) " than add any sample text in that parital view.

Now, If you run the application it would accessible like the below.


But, If you add the attribute named as “[ChildActionOnly]” then it does not allow us to access directly from the URL. The code block looks like the below.
        /// 
        /// Demo Partial Result
        /// 
        /// 
        [ChildActionOnly]
        public ActionResult DemoPartialResult()
        {
            return PartialView("_Demo");
        }


Now,If you are trying to access from the URL, It shows the error like the below.


Event, if you can't access the Partial View result action method from ajax call as well.
For Example, The ajax call, you defined in the code like the below.

Now, If you are trying to access that page then you can identify the error in Console window of the browser is as follows.


Conclusion


I hope you got idea how to prevent Partial view Results directly accessing from URL or ajax calls in MVC. Please provide you valuable suggestions and comments if any.


Monday, 15 September 2014

Partial View Result Return Type in MVC 5 with sample Web application


About:


PartialView is the one of  the ActionResult type in MVC. This is also inherited from the ViewresultBase clas.  You can use Partial View is kind of user control in MVC.

So, This PartialView is mostly used for to reduce the repetitive code and also for easy code maintainability.   


How Can you Call/Display Partial View:

you can call or display partial view with in the view mainly in four types with the use of html helper methods.

Those are

1. Html.Partial
2. Html.RenderPartial
3. Html.Action
4. Html.RenderAction

I can discuss more about these types in a later post.

Example:

A customer having the details of customer Id, Customer Name and address like Present and Permanent address details.

Key Points to Cover:

  1. Display the customer details using partial view
  2. Edit, update the details using partial view
  3. Create the customer details by using partial view
  4. Delete the customer details by using partial view
  5. How to use Partial view in a view more than once (As I discussed it is kind of user control in MVC)
  6. Strongly typed Partial Views
Note:  This demo is being prepared with Visual Studio 2013 and MVC 5.

you can download the sample project source from the link Download Project

Step 1:

I am going to create new project in Visual Studio 2013 application.
Add a New project from the visual studion, then the displayed screen is as follows.


As, you can see in Visual Studio 2013, you are having only one type of Web application, But if you are selected in VS 2012 template it looks like below.


In this example, I am using Visual Studio 2013 with MVC5.

Step 2:


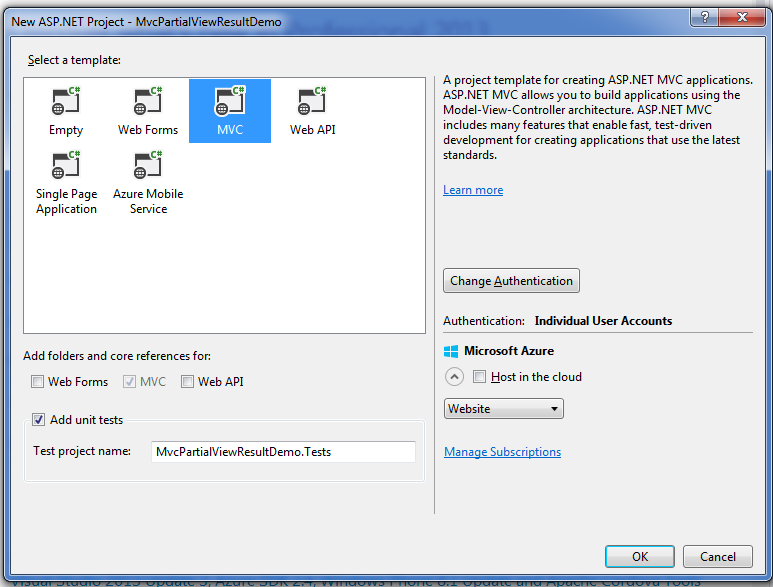
you can type the Name as “MvcPartialViewResultDemo” and then click on Ok button then the resultant screen displayed as below.


Here, you can select the project template as “MVC” and also select the “Add unit tests”  at the left most corner of the the template then the Test project name displayed as “MvcPartialViewResultDemo.Tests”. 

Its always better practice to select the Unit test project in MVC as it supports TDD (Test Data Driven) approach.

Step 3:

Click on Ok button, then it would create beautiful MVC application with addition of so many features like Login, Register, sample Layout with Responsive design approach (Bootstrap), claim based authentication template (Like login through gmail, facebook etc).  You can simply say that this is the power of visual studio. The displayed project home screen is as follows.


Now, Just click on F5 button, to see the sample MVC application till now what you have created. 


you, can just click on “Restore Down” button or just reduce the browser width then you can identify the resultant responsive design as follows.


So, Sample MVC web application is ready even with out writing single line of code.
Step 4:
The web application solution explorer looks like below.


 The highlighted parts of solution explorer as Model, View and Controller, you mainly work on those following components in this example.
Now, you can add one class named as CustomerModel.cs in the Model folder by right click on Model folder then Add and choose the class.


By clicking on “class” the template looks like below.

Click on “Add” button then the class will be created. Now, you can replace that class file code with the below code.

using System;
using System.Collections.Generic;
using System.Linq;
using System.Web;
namespace MvcPartialViewResultDemo.Models
{
    public class CustomerModel
    {
        public int CustmerId { get; set; }
        public string CustomerName { get; set; }
        public CustomerAddress PermanantAddress { get; set; }
        public CustomerAddress PresentAddress { get; set; }
    }
    public class CustomerAddress
    {
        public string DoorNumber { get; set; }
        public string City { get; set; }
        public string State { get; set; }
        public string PinNumber { get; set; }
    }
}

Now, The Customer Model is ready in your application.

You can add a controller named as CustomerController.cs in the controller folder.
Right click on  Controllers folder then Add and the controller


 Click on “Controller” then the screen looks like below.


This above template provides various types of controllers, In that you can choose the template named as “MVC 5 Controller with read/write actions” then click on “Add” button then another popup will appear its asks you about controller name. So, name it as “CustomerController” like the below.

Now, Just click on “Add” button, It would create CustomerController.cs file.

Are you bit surprised!!! while checking the code as it generates so much of code with all read/write actions. This is the power of template while creating a customer controller what you have chosen.

Note: Even you can define your own level of changes in that controller template by defining custom CodeTemplates (T4 Templates) in your project folder as well.

The CustomerController.cs  code file looks like below.


Step 6:

Now, you are going to add a partial view which helps to display Address details of a customer. Partial Views can be added with in the parent controller or a shared folder. As a part of coding practice the partial view can be prefixed with “_”.

Add a partial view by following the below steps

  1. Go to Solution Explorer
  2. Views folder
  3. Inside Views folder right click on Shared folder
  4. Click on Add and then View
The resultant screen looks like follows.


Now, click on “View” it opens a popup and apply the changes as per below screen

Changes:

View Name: _CustomerAddressDetails
Template Name: List
Model class: CustomerAddress


select the Create as a Partial view option and then click on “Add” button to creates the partial view. Now, Replace the “_CustomerAddressDetails.cshtml” code with the below code.

@model MvcPartialViewResultDemo.Models.CustomerAddress
@Html.DisplayNameFor(model => model.DoorNumber)
@Html.DisplayFor(model => model.DoorNumber)
@Html.DisplayNameFor(model => model.City)
@Html.DisplayFor(model => model.City)
@Html.DisplayNameFor(model => model.State)
@Html.DisplayFor(model => model.State)
@Html.DisplayNameFor(model => model.PinNumber)
@Html.DisplayFor(model => model.PinNumber)
Step 7:

You can add view to the controller action method named as Index to display the list of all customer details.

 By Clicking on  “Add View” It displays popup and choose the setting as mentioned in the screen.

 Changes:

View name: Index
Template: List (As we are going to display list of customer details)
Model class: CustomerModel

Click on “Add” button then the view will be created  and the displayed screen is as follows.


 Now, update the Index.cshtml with the following design.

@model IEnumerable

@{
    ViewBag.Title = "Index";
}


Customer Details

@Html.ActionLink("Create New", "Create")

@*Headers*@ @*Customer Data*@ @foreach (var item in Model) { }
@Html.DisplayNameFor(model => model.CustmerId) @Html.DisplayNameFor(model => model.CustomerName) @Html.DisplayNameFor(model => model.PresentAddress) @Html.DisplayNameFor(model => model.PermanantAddress)
@Html.DisplayFor(modelItem => item.CustmerId) @Html.DisplayFor(modelItem => item.CustomerName) @Html.Partial("_CustomerAddressDetails",item.PresentAddress) @Html.Partial("_CustomerAddressDetails", item.PermanantAddress) @Html.ActionLink("Edit", "Edit", new { id=item.CustmerId }) | @Html.ActionLink("Details", "Details", new { id = item.CustmerId }) | @Html.ActionLink("Delete", "Delete", new { id = item.CustmerId })
The Index.cshtml file displays as follows.


 Step 8:

Now, open the CustomerController.cs file and add the code as follows to get the list of customer details.

Add a namespace as like below.


using MvcPartialViewResultDemo.Models;
to the CustomerController.cs file and then add the following method to CustomerController.cs file 

public List GetCustomerDetails()
        {
            var customerList = new List();
            for (int i = 1; i <= 2; i++)
            {
                var customer = new CustomerModel
                {
                    CustmerId = i,
                    CustomerName = string.Concat("Customer", i),
                    PermanantAddress = new CustomerAddress()
                    {
                        DoorNumber = string.Concat("Permanent-D.No:4-xx-", i),
                        City = string.Concat("Permanent-City", i),
                        State = string.Concat("Permanent-State", i),
                        PinNumber = string.Concat("Permanent-Pin", i)
                    },
                    PresentAddress = new CustomerAddress()
                    {
                        DoorNumber = string.Concat("Present-D.No:4-xx-", i),
                        City = string.Concat("Present-City", i),
                        State = string.Concat("Present-State", i),
                        PinNumber = string.Concat("Present-Pin", i)
                    }
                };
                customerList.Add(customer);
            }
            return customerList;
        }
and then update the Index action method code as follows. 

 // GET: Customer
        public ActionResult Index()
        {
            var customerDetails = GetCustomerDetails();
            return View(customerDetails);
        }
Now, you can build the application( Ctrl+Shift+B), After a few moments it should be “Build succeeded” then run the application by hitting F5 and then change browser URL (
http://localhost:60385/Customer/Index ) The output screen is as follows. 


As of now, you are able to display the customer details. Now, you can work on Details of each specific customer.

Step 9:

Go to the CustomerController.cs file and add a “view” for the Action method Details.


The view template is as follows. 


Click on “Add” button and then delete and update the design html is as follows.
@model MvcPartialViewResultDemo.Models.CustomerModel
@{
    ViewBag.Title = "Details";
}

Customer Details

@Html.DisplayNameFor(model => model.CustmerId)
@Html.DisplayFor(model => model.CustmerId)
@Html.DisplayNameFor(model => model.CustomerName)
@Html.DisplayFor(model => model.CustomerName)
@Html.Partial("_CustomerAddressDetails", Model.PermanantAddress) @Html.Partial("_CustomerAddressDetails", Model.PresentAddress)
@Html.ActionLink("Edit", "Edit", new { id = Model.CustmerId }) | @Html.ActionLink("Back to List", "Index")

Step 10:

Now, Add the method GetCustomerById to the CustomerController.cs file is as follows.


public CustomerModel GetCustomerById(int customerId)
        {
            var customerDetails = GetCustomerDetails();
            var customer = (from cust in customerDetails
                where cust.CustmerId == customerId
                select cust).FirstOrDefault();
            return customer;
        }

Now, Update a details action method for CustomController.cs file.

// GET: Customer/Details/5
        public ActionResult Details(int id)
        {
            var customerModel = GetCustomerById(id);
            return View(customerModel);
        }
Build the solution and then hit the “F5” button to see the result by navigating to the URL http://localhost:60385/Customer/Details/1.


Step 11:

Now, Create another partial view to manage the edit/create operations for customer address. The flow for the screen shots is as below. 


By Clicking on "Add" button "_CustomerAddress.cshtml" file would be created and then replace the design with the following below.


@model MvcPartialViewResultDemo.Models.CustomerAddress
    

@Html.ValidationSummary(true, "", new { @class = "text-danger" })
@Html.LabelFor(model => model.DoorNumber, htmlAttributes: new { @class = "control-label col-md-2" })
@Html.EditorFor(model => model.DoorNumber, new { htmlAttributes = new { @class = "form-control" } }) @Html.ValidationMessageFor(model => model.DoorNumber, "", new { @class = "text-danger" })
@Html.LabelFor(model => model.City, htmlAttributes: new { @class = "control-label col-md-2" })
@Html.EditorFor(model => model.City, new { htmlAttributes = new { @class = "form-control" } }) @Html.ValidationMessageFor(model => model.City, "", new { @class = "text-danger" })
@Html.LabelFor(model => model.State, htmlAttributes: new { @class = "control-label col-md-2" })
@Html.EditorFor(model => model.State, new { htmlAttributes = new { @class = "form-control" } }) @Html.ValidationMessageFor(model => model.State, "", new { @class = "text-danger" })
@Html.LabelFor(model => model.PinNumber, htmlAttributes: new { @class = "control-label col-md-2" })
@Html.EditorFor(model => model.PinNumber, new { htmlAttributes = new { @class = "form-control" } }) @Html.ValidationMessageFor(model => model.PinNumber, "", new { @class = "text-danger" })
Step 12:

Open CustomerController.cs file and update the Get Edit Action method with the below code.
// GET: Customer/Edit/5
        public ActionResult Edit(int id)
        {
            var customerModel = GetCustomerById(id);
            return View(customerModel);
        }
and then add a view for the Edit method like the below. 


After that, update the Edit.cshtml  with the following html design  


@model MvcPartialViewResultDemo.Models.CustomerModel
@{
    ViewBag.Title = "Edit";
}

Edit

@using (Html.BeginForm()) { @Html.AntiForgeryToken()
@Html.ValidationSummary(true, "", new { @class = "text-danger" })
@Html.LabelFor(model => model.CustmerId, htmlAttributes: new { @class = "control-label col-md-2" })
@Html.TextBoxFor(model => model.CustmerId, new { @class = "form-control", disabled = "disabled", @readonly = "readonly" })
@Html.LabelFor(model => model.CustomerName, htmlAttributes: new { @class = "control-label col-md-2" })
@Html.EditorFor(model => model.CustomerName, new { htmlAttributes = new { @class = "form-control" } }) @Html.ValidationMessageFor(model => model.CustomerName, "", new { @class = "text-danger" })

Permanent Address:

@Html.Partial("_CustomerAddress", Model.PermanantAddress)

Present Address:

@Html.Partial("_CustomerAddress", Model.PresentAddress)
}
@Html.ActionLink("Back to List", "Index")
Changes:
Disable the customer id
Include the _CustomerAddress.cshtml partial view

Now, update the Post method of Edit action in CustomerController.cs code as below.

Post method of Edit action controller code.

Build the application and hit F5, Navigate to  http://localhost:60385/Customer click on any Edit link of the customer and then update the data like the below.


After updating the details by click on “Save” button it goes to the  post action of Edit method and I have captured the field values while in debugging mode for reference. 
 
As, you observed the Post method of Edit contains two parameters one for CustomerId and another for get the all form control values.

So, FormCollection is being used to get all the control values. As you are used one partial view two times in a form to get the permanent and present address details. The FormCollection values are comes with “,” separator.

Step 13:

Add a view named as “Create.cshtml” from the get action method “Create” in customerController.cs file is as follows.


And then update the design by including Partial views is as follows.


@model MvcPartialViewResultDemo.Models.CustomerModel
@{
    ViewBag.Title = "Create";
}

Create

@using (Html.BeginForm()) { @Html.AntiForgeryToken()

CustomerModel


@Html.ValidationSummary(true, "", new { @class = "text-danger" }) @*
@Html.LabelFor(model => model.CustmerId, htmlAttributes: new { @class = "control-label col-md-2" })
@Html.EditorFor(model => model.CustmerId, new { htmlAttributes = new { @class = "form-control" } }) @Html.ValidationMessageFor(model => model.CustmerId, "", new { @class = "text-danger" })
*@
@Html.LabelFor(model => model.CustomerName, htmlAttributes: new { @class = "control-label col-md-2" })
@Html.EditorFor(model => model.CustomerName, new { htmlAttributes = new { @class = "form-control" } }) @Html.ValidationMessageFor(model => model.CustomerName, "", new { @class = "text-danger" })

Permanent Address:

@Html.Partial("_CustomerAddress")

Present Address:

@Html.Partial("_CustomerAddress")
}
@Html.ActionLink("Back to List", "Index")
After that, update the code in Post Create Action method is as follows.

// POST: Customer/Create
        [HttpPost]
        public ActionResult Create(FormCollection collection)
        {
            try
            {
                var customerModel = new CustomerModel
                {
                    CustmerId =  5, //Get the max+1 from customer list
                    CustomerName = collection["CustomerName"],
                    PermanantAddress = new CustomerAddress()
                    {
                        DoorNumber = collection["DoorNumber"].Split(',')[0],
                        City = collection["City"].Split(',')[0],
                        State = collection["State"].Split(',')[0],
                        PinNumber = collection["PinNumber"].Split(',')[0]
                    },
                    PresentAddress = new CustomerAddress()
                    {
                        DoorNumber = collection["DoorNumber"].Split(',')[1],
                        City = collection["City"].Split(',')[1],
                        State = collection["State"].Split(',')[1],
                        PinNumber = collection["PinNumber"].Split(',')[1]
                    }
                };
                // TODO: Add insert logic here
                return RedirectToAction("Index");
            }
            catch
            {
                return View();
            }
        }
Now, you are ready with the Create functionality of Customers as well. Just hit F5 and then click on “Create New” customer link then fill the details as you required. 


After entering the details, click on Save button to save the details.  


As you noticed in the above image, you would get the all details then you just need to send that customer model object to the database call to save the details.

Step 14:

Add a view named as “Delete.csthml”  from the get action method named as “Delete” in CustomerController.cs file.


And then update the design by including Partial views is as follows.


@model MvcPartialViewResultDemo.Models.CustomerModel
@{
    ViewBag.Title = "Delete";
}

Delete

Are you sure you want to delete this?


@Html.DisplayNameFor(model => model.CustmerId)
@Html.DisplayFor(model => model.CustmerId)
@Html.DisplayNameFor(model => model.CustomerName)
@Html.DisplayFor(model => model.CustomerName)
@Html.Partial("_CustomerAddressDetails", Model.PermanantAddress) @Html.Partial("_CustomerAddressDetails", Model.PresentAddress)
@using (Html.BeginForm()) { @Html.AntiForgeryToken()
| @Html.ActionLink("Back to List", "Index")
}

Update the code in get  Delete  action method is as follows.

 // GET: Customer/Delete/5
        public ActionResult Delete(int id)
        {
            var customerModel = GetCustomerById(id);
            return View(customerModel);
        }

Update the code in post delete action method is as follows.
// POST: Customer/Delete/5
        [HttpPost]
        public ActionResult Delete(int id, FormCollection collection)
        {
            try
            {
                if (id > 0)
                {
                    // TODO: Add delete logic here
                }
                return RedirectToAction("Index");
            }
            catch
            {
                return View();
            }
        }

Build the application and hit F5 button then navigate to the “http://localhost:60385/Customer/Index” and then click on delete link to delete the customer as you desired. The delete customer output is as follows.


As you observed the above image you are getting the customer id then you can perform the database call to delete the customer.

Conclusion:

I hope this above example gives you a brief idea on usage of partial views with a sample application of customer related operations(Details, Display, Create, Edit and Delete) and also you can get some idea how can you create sample application by using MVC.

Please provide your valuable suggestions and feedback if  any.

Friday, 5 September 2014

View Result Return Type in MVC 5.0

About:

ViewResult is the one of the ActionResult type which will render the specified view as web Page. This class is inherited from the ViewResultBase class (PartialViewResult also inherited from the same class).

Examples:

You can use ViewResult Type as return type in six different ways. I am going to explain all those with simple code examples.

Example1:

This type you can return directly named as View(). In this scenario the controller action method name and view name are the same.

So, This example Action Controller method name and view name is: Example1

Code:
        
       /// 
        /// Returns the Default view which is named 
        /// as Action controller method name (i.e Example1.cshtml)
        /// 
        /// 
        public ActionResult Example1()
        {
            return View();
        }

Example 2:

 This example you can return the view with View Name (Which is already exists). So you can use the single view in multiple action controller methods based on you requirement.

So, This example you are using Example1 view for the action controller method Example2.

Code:
        
       /// 
        /// Returns the View as you mentioned in the parameter
        /// named as Example1.cshtml
        /// 
        /// 
        public ActionResult Example2()
        {
            return View("Example1");
        }

Example 3 :

 This example, you can return the view with the View Name(Which is already exists) and also with the model entity.

Code:

Model Entity:
       namespace Mvc.ViewResult.Models
       {
          public class DemoModel
          {
              public string Name { get; set; }
          }
       }
Action Controller method returns as View with model entity
        /// 
        /// Returns the view Example1 with the DemoModel entity
        /// 
        /// 
        public ActionResult Example3()
        {
            var demoModel = new DemoModel
            {
                Name = "View Result example"
            };
            return View("Example1", demoModel);
        }

Example 4: 

This example, you can return the same view named as controller action method with the entity Demo Model.

Code:

        /// 
        /// Returns the view same as Controller method name 
        /// (i.e Example4.cshtml) with the DemoModel entity
        /// 
        /// 
        public ActionResult Example4()
        {
            var demoModel = new DemoModel
            {
                Name = "View Result example"
            };
            return View(demoModel);
        }

Example 5: 

This example, you can return the view named as Example1 (Already exists) and the second parameter as _Layout which acts as dynamic master page. you can assign the master page dynamically based on your code conditions or requirements.

Code:
        /// 
        /// Returns the View named as Example1 with the 
        /// dynamic master page (_Layout) as a second parameter
        /// 
        /// 
        public ActionResult Example5()
        {
            return View("Example1", "_Layout");
        }

Example 6:

This example, you can return the view named as Example1(already exists) , Master page named as (_Layout) and also the Demo Model entity.

Code:

        /// 
        /// Returns the view Example1, Master page _Layout
        /// with the Demo Model entity
        /// 
        /// 
        public ActionResult Example6()
        {
            var demoModel = new DemoModel
            {
                Name = "View Result example"
            };
            return View("Example1", "_Layout", demoModel);
        }

Conclusion:

I hope this article gives you brief idea on ViewResult Return Type with the code examples.
Please provide your valuable suggestions and comments if any.